

Looking for a tutorial on how to plan a trip with Google My Maps? We got your back!
It’s not a secret we have something with maps, right? Tip: Reread the name of our blog.
We at Maps ‘N Bags love organization, and we have a thing for maps.
Bruna framed the map of all the cities she lived in. We have a map in our office where we add pins to places where we have been, and when we were a child, we used to open the Atlas and dream about the places we would go to someday. Well, that’s no different with digital maps.
Plan a Trip in Google My Maps
Ever since a friend told us about it, we’re constantly planning a trip using Google My Maps. This handy Google product can be used to plan your trips to literally anywhere around the world. It’s true.
From a city trip to Lisbon to a romantic trip to Paris to a road trip in Ireland, you can easily create customized maps and enjoy the ride.
But you might be thinking “How do I create a custom map in Google My Maps?”. Don’t worry. Below we’ve written a detailed explanation about this tool’s features, how it can be valuable to you, how you can use it to plan your trip (step-by-step), and even a brief faq section.
Want to know how to plan a trip with Google My Maps? Read on!
In today’s post we’ll talk about:
What is Google My Maps?
Google My Maps gives people the ability to create customized maps for personal use and to share it with others.
At My Maps, besides being able to measure distances and areas, you can also add pins at places you want to save for later, lines, shapes, photos, videos, and cycling as well as walking and driving directions.
If you want to use the map on another device/app, you can also export it or even import data from spreadsheets to create your maps. This is Google, folks. There is a world of possibilities here (and limitations too).
You can use Google My Maps to…
…plan future trips
Nowadays we receive impulses from diverse devices — Mobile, TV, tablet, etc. Life happens fast, and we do lots of things in one day.
So how will you remember the name of that beautiful place you saw on Pinterest or just on Google three years ago? It’s impossible!
That’s why we have a map named “Northeastern Asia,” for example, where we have created a layer for each country, and whenever we see a place we’d like to visit on the backpacking trip we’re planning, we add a pin to it.
Or say you want to go hiking in a national park. Let’s use one of our favorite ones for this example, Banff in Canada. You could add the trails throughout the park to the map which you would like to hike. Google My Maps is excellent for trip planning!
…plan your vacation’s itinerary
It doesn’t matter if you’re going on a city trip or road trip. You can use Google My Maps to plan the places to visit, stops you will make along the way, where your accommodation is, and much more.
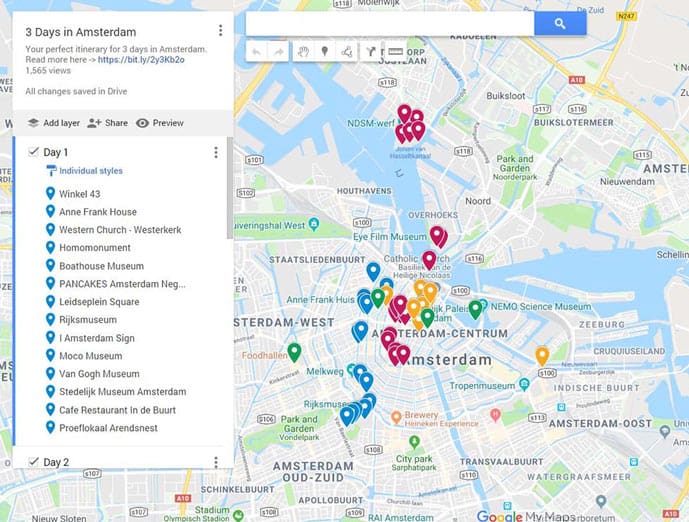
Frank and I both use My Maps to plan our trips, and we usually divide our itinerary into days (layers in Google My Maps) and create a separate layer for hotels, so we can find everything easily.
This article about Amsterdam has an example of a map we created for a trip.
…guide yourself while on vacation
Easy peasy. Open your saved map on your mobile, simply click on “Directions,” and the app will show how you can get on a pinned place departing from your current location.
This way you don’t have the risk of getting lost or having to mimic to ask where a place is.

Why should you use Google My Maps to plan your trips?
1. Great for organization and highly customizable
Save all the locations you need in one place. From accommodation to a museum or park you want to visit.
No need to carry papers, notes, notebooks, or whatever you might need to have that information by hand. They are all organized in one place, which is also much better for the environment.
Again, this goes into organization too. You can completely customize your map by choosing the pins for each location, their colors, categorize them by layers, add images or videos, create routes between locations (by car, bike, or walking).
If you have a visual memory as good as Bruna has, you will know this makes a huge difference when planning a trip.
Also, you can also customize the base map to only show public transportation pins besides the ones you have already chosen yourself or a satellite map. There are many options here!
Note the maps can only be edited on mobile if you have an Android phone because Google My Maps is only available on Android. On iPhones, it is possible to open and view maps, but they can not be edited.
2. Connect with other Google services, such as Google Drive and Maps
It’s all connected. All your maps are saved in the cloud. Meaning, you can access them from anywhere using Google Maps App, when on your mobile, of course.
This also means that My Maps gathers information about stores, attractions, businesses, etc from Google Maps.
Moreover, you can create a folder in your Google Drive with your maps, travel planner, packing list, and so on.
3. It automatically saves your changes
It might not seem a big deal, but have you ever forgotten to save a document and then your laptop just ran out of battery, and you lost everything you had just worked on?
We have. Not one, but many times, for many reasons. But Google’s products automatically save all that you type every second, so you won’t have that problem anymore.

4. More than one person can collaborate
You and your travel buddy can now collaborate on the trip route at the same time. All you need is to share the map with your friend. But you can also share it with a whole group of people if you want, or make it totally public.
Or say you’re traveling somewhere a friend has already been to. They can share the map with you so you can follow his/her itinerary.
It can also work the other way around obviously. This is a handy way to give your friends travel advice.
5. No more hassle in non-English speaking countries (no need to ask directions)
Since all the locations you need are right there in your hands, you can simply click on the next place you want to visit on your map and go.
The app shows some info about your destination together with the button “Directions.” Click on it and follow the route. Done. No need to mimic to ask where the places are.
6. Import spreadsheets to easily create a map
Before Google My Maps, we used to write down the destinations we wanted to visit in a spreadsheet.
Something like a bucket- or wishlist.
So when we discovered this new Google product we were pleased to know we wouldn’t have to type in this spreadsheet every single place we would like to visit. We could simply import them.
So if you’re anything like us and love spreadsheets to organize everything, including your trips, just import that file into a layer, and your new map is created. Piece of cake!
How to use plan a trip with Google My Maps? – Tutorial
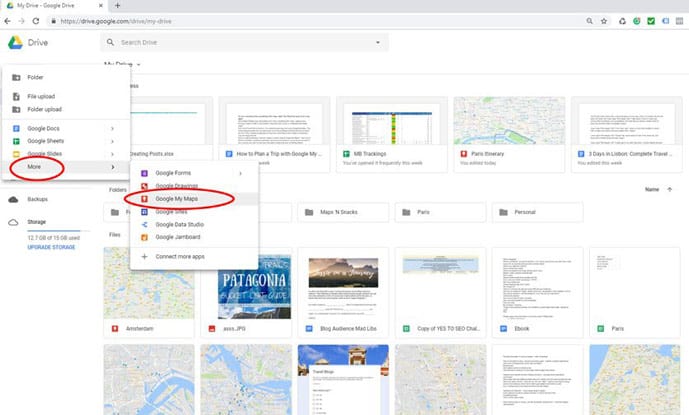
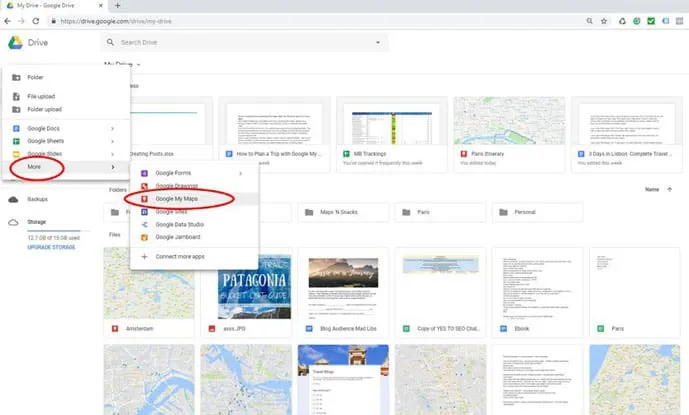
First of all, you need a Google account. Sign up for Gmail if you haven’t already, then open your Google Drive on your desktop.
Now click “New” -> “More” -> “Google My Maps,” as shown in the images below.
You’re in! Now you have a brand new and empty map that needs to be filled. So let’s go on.
Open Google My Maps
Change map and layer name
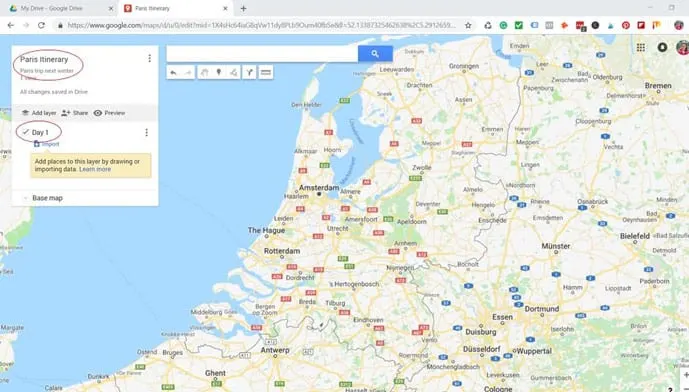
So, let’s say you’re traveling to Paris and you want to plan your itinerary with this map to follow while there.
First things first. Let’s change the map and layer title right away.
Steps:
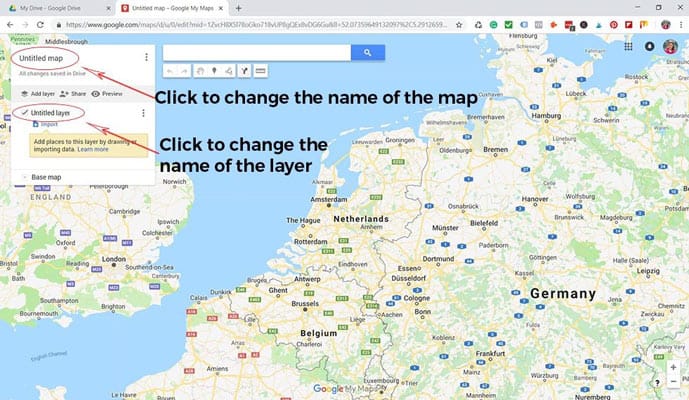
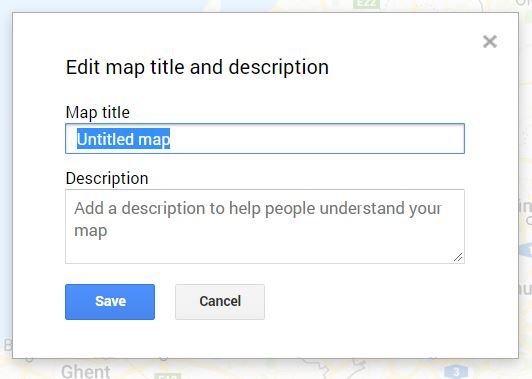
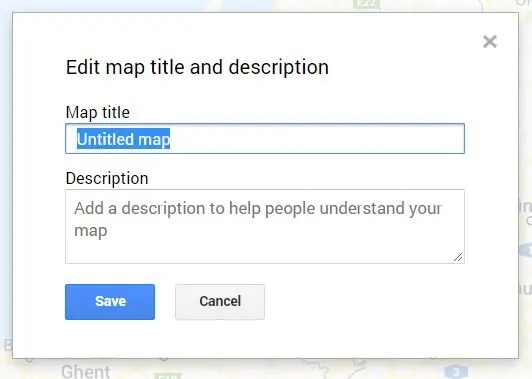
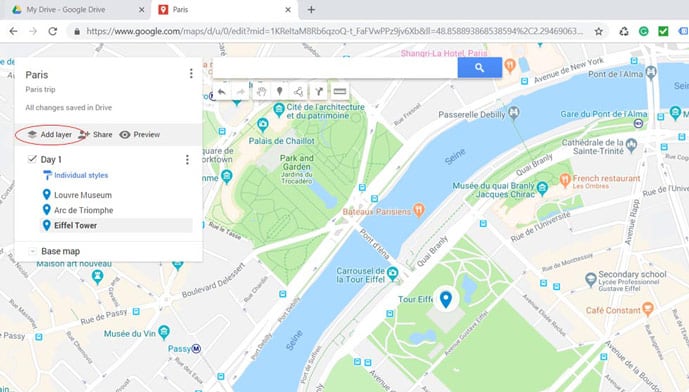
1 – In the top left-hand corner, click on “Untitled map” -> Change its name and add a description, if you want. -> Save.
2 – Click on “Untitled Layer” -> Change its name so you can organize the pins you will save.


As we said, you can use layers to organize your pins. For example, you might want to save things to do in a city in the order you want to visit them.
To illustrate, you create a layer called “Day 1”, and in here you save all activities and restaurants/coffee shops that you will visit on the first day of your vacation.
Alternatively, you can also use layers as categories, such as “Museums,” “Coffee Shops,” and “Parks.”
There is a world of possibilities here, so do whatever works best for you. We prefer organizing it by day, but that’s personal. Not that we strictly follow the order inside the layer, but it helps us plan our trips better.
Add pins to your map
Now that you have a layer, it’s time to add pins to it.
Steps:
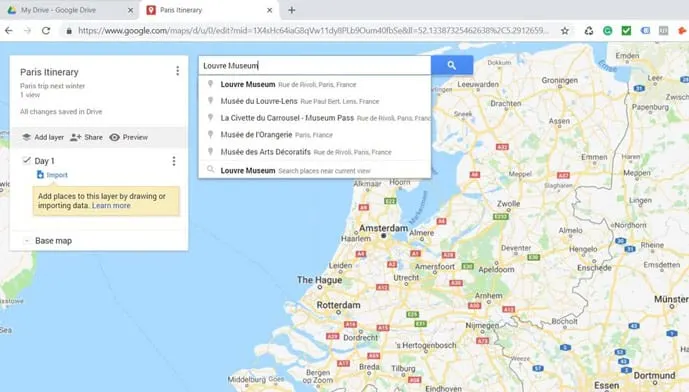
1 – Search for the location by typing the address (or name) in the search bar.
- Sometimes Google can’t find remote places, so instead, you can enter the latitude-longitude information to find the location.
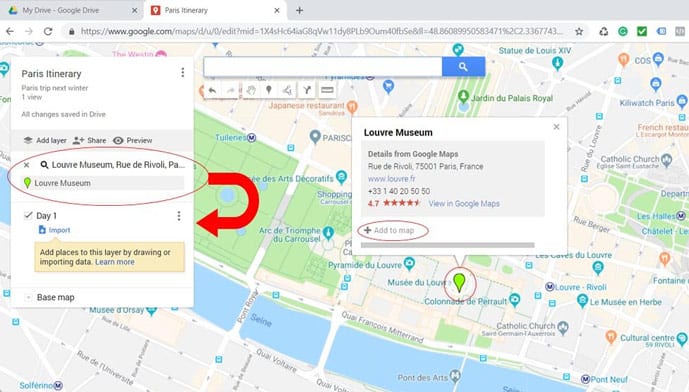
2 – Once you press enter you will see the second screen below. The map shows you a green pin on the map and its name on the left-hand sidebar. Note that what appears on the sidebar isn’t in your layer yet.
3 – Once you find the right place, click on “+Add to map” on the popup above your pin and it will add it to the layer.
- Alternatively, you can also add a location by clicking on any pin from Google My Maps itself (like landmarks, restaurants, shops, etc.), then a popup will appear on your screen like in the steps above. Just click on “+Add to map”.
- Or, you can just click on the pin icon under the search bar (the 4th one) and add any location yourself.
To delete a pin, click on it and on the trash bin icon on the popup.


Add layers to your map
Layers help you organize all the information you pin to Google My Maps. As we said, we usually divide the things to do by day, but you can try different things to see what works best for you.
Steps:
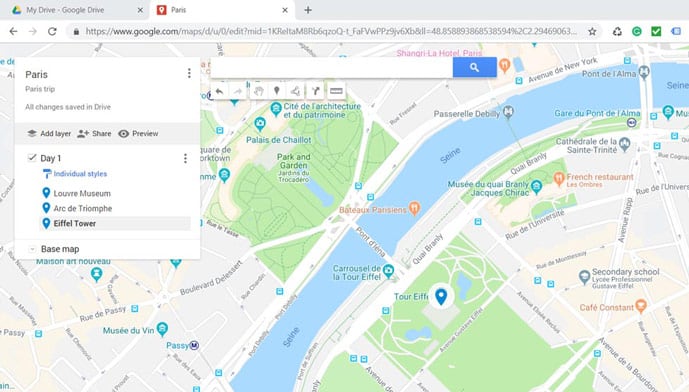
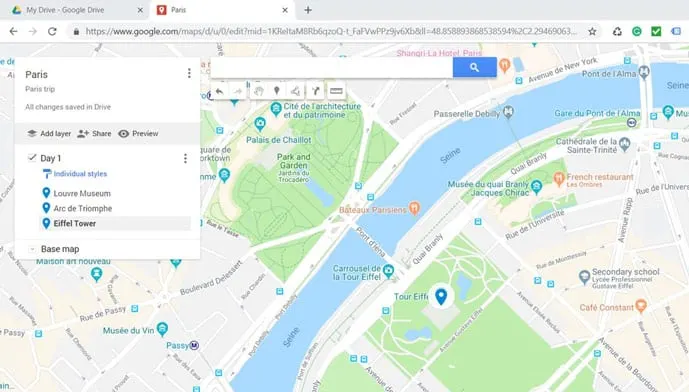
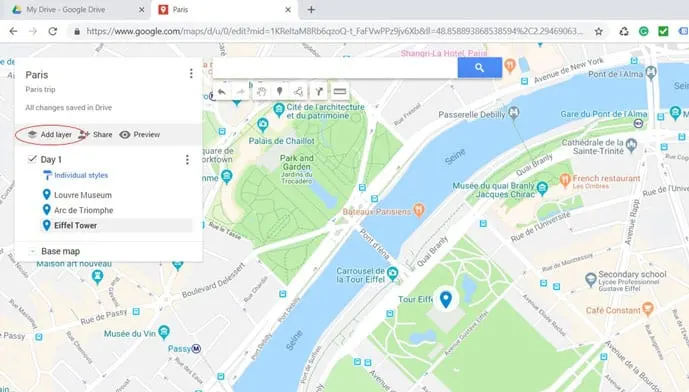
1 – Click “Add Layers” on the left-hand sidebar as shown in the image below.
2 – Click on “Untitled layer” to change its name (like you have done above).
3 – Be sure to select the right layer before adding new pins. You can check which one is selected by the blue vertical line that appears on the left side of a layer (see second image below).
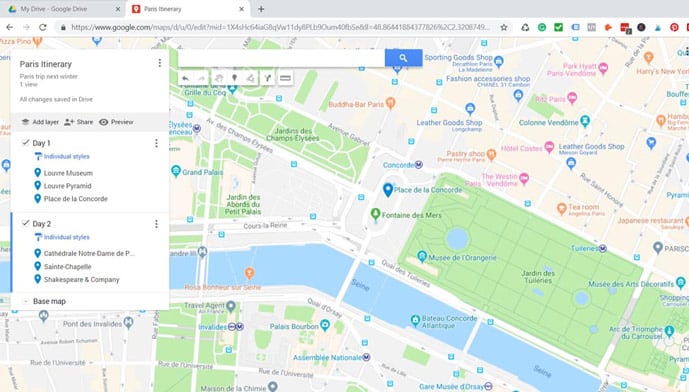
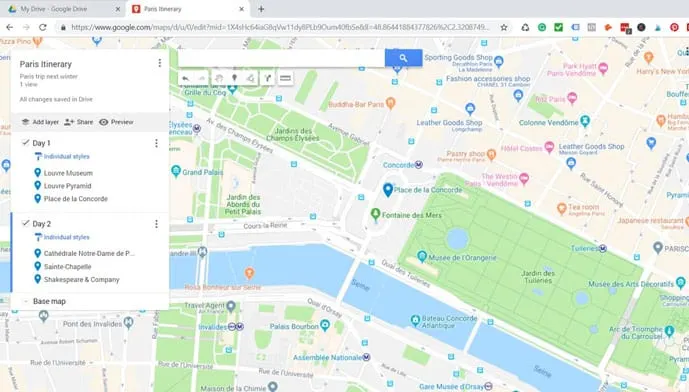
If you by mistake add a pin to the wrong layer, click the name of the pin on the sidebar, hold down the mouse and just drag it to the right layer.
To delete a layer, click the three vertical dots on the right side of the layer’s name and choose “delete it.”
Google My Maps Options
Google My Maps has a few other options we’ll briefly explain below, so you know where to find them, in case you need any of these features.
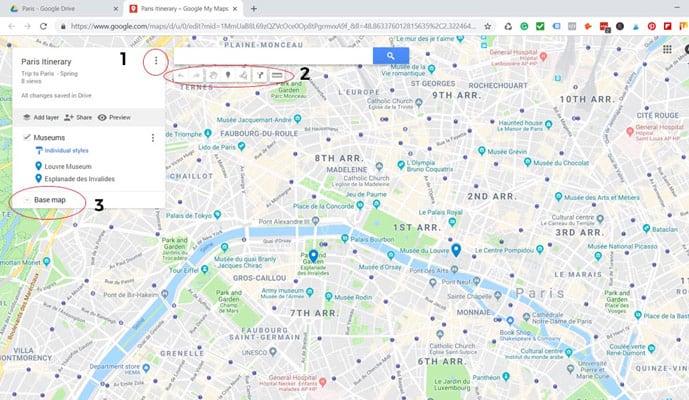
Number 1 in the image above (the three dots next to the map’s title):
- New map – create a brand new map and close the current one
- Copy map – make a copy of the current map
- Open a map – open an existing map in the same window
- Move to bin – delete the current map
- Set default view – choose the default view you want to see every time you open the map
- Embed on my site – embed a map in a website
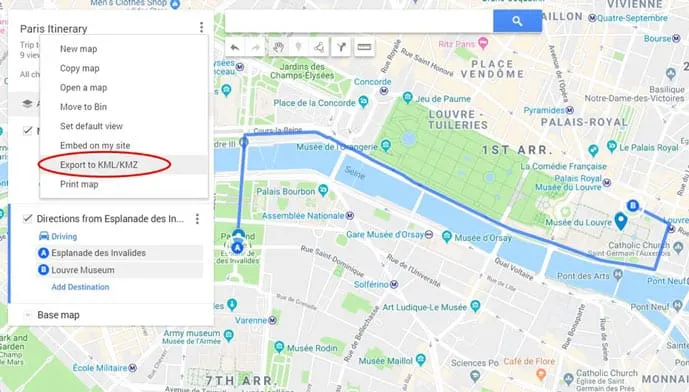
- Export to KML/KMZ – export your map or one layer to KML (online) or KMZ to use on other devices
- Print map – print map
Number 2 in the image above (options under the map’s search bar):
- Undo arrow – undo the last action
- Redo arrow – redo the last action
- Default mouse cursor – select the default cursor to move the map around
- Add marker – by choosing this option, you can add a pin yourself without typing in an address or name
- Draw a line – you can create a line or shape in your map. This can also be used as driving, cycling, or walking route planner. We will talk more about driving directions in the next section
- Add directions – creates a new layer specifically for a route, which again, can either be driving, cycling or walking route
- Measure distances and areas – measure the distance between places by selecting them on the map, or a whole area. To measure an area, click on the map to create the limits of a stretch, then double-click on the first point you’ve just chosen on the map to close the area
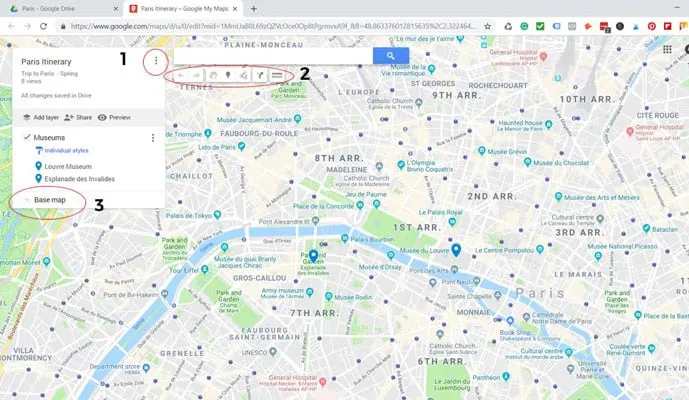
Number 3 in the image above (Base maps available):
- Map – Normal, basic map with Google’s own pins
- Satellite – Satellite imagery like Google Earth
- Terrain – Terrain view option to help you plan a trek
- Light political – Governmental boundaries
- Mono city – Only show public transportation pins
- Simple atlas – Public transportation pins and primary relief of buildings
- Light landmass – No street information, just the added pins
- Dark landmass – The same as previous, but in darker colors
- Whitewater – Neutral colors
FAQ Google My Maps
How can I share my maps?
Steps:
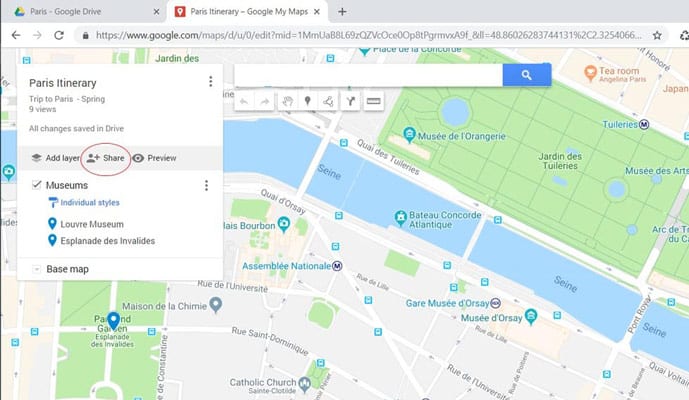
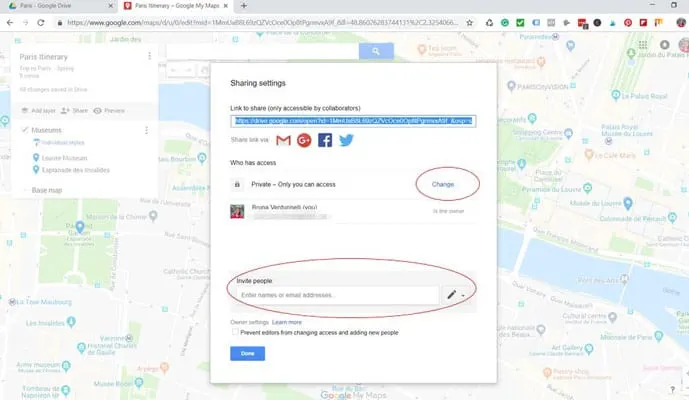
1 – On the left-hand sidebar click on “Share”. See the first image below.
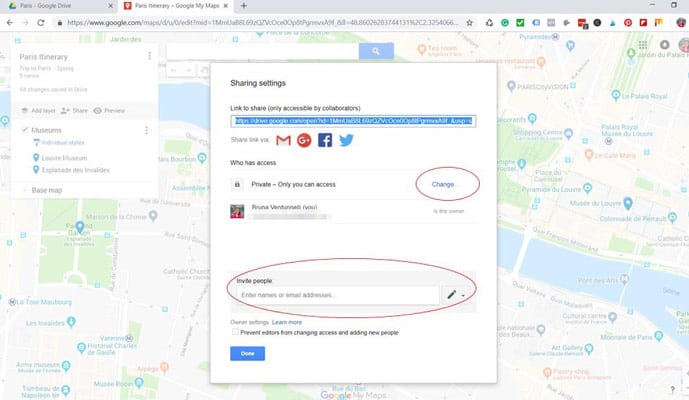
2 – You can share it with specific friends only or with the public (this means anyone can access it). To share with your friends, type their email addresses where it says “Invite People” and send an invitation to them. See the second image below.
Or…
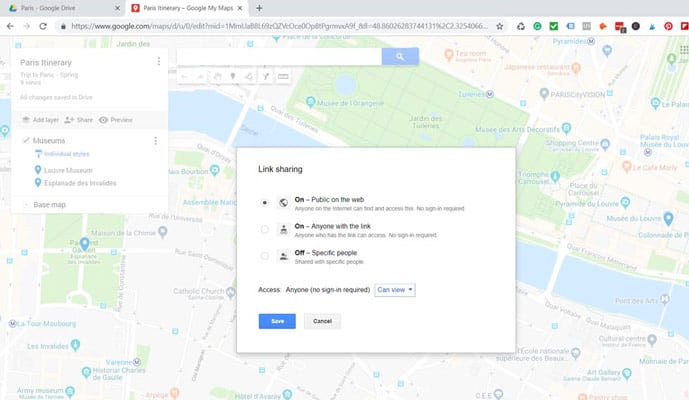
2 – Under “Who has access” click on “Change.” There you have three options:
- Make the map visible to anyone on the web.
- Make the map visible to anyone with the link of the map.
- Share it with specific people, which will be already selected on your map.
Note that for each of these options you can choose whether the people you’re sharing your map with can edit it or only view it. See the third image below.


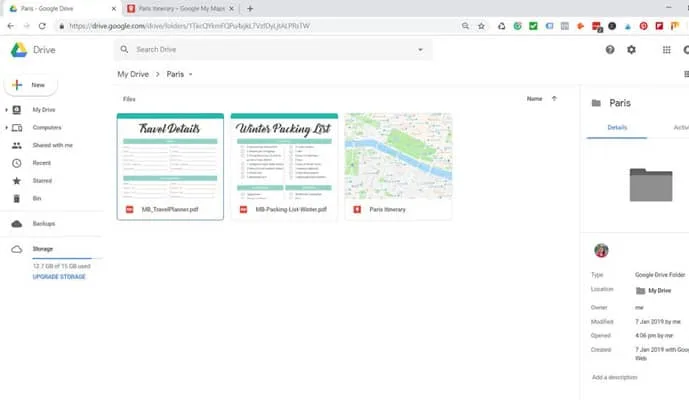
Where are my saved maps?
They are all in your Google Drive. In the search bar of Google Drive type the file’s name and you will find it.
You can also organize it in a folder with other documents regarding your trip. See the example below.
We have created a folder with a travel planner, packing list, and the map with our itinerary.

How to import files on Google My Maps?
Steps:
1 – First of all, make sure your file (xlsx, csv, gpx, tsv, and Google Sheet up to 40MB or kmz and kml up to 5MB) is unzipped. The first row of your document (up to 2,000 rows) must have the titles of the columns, not the places. See the example below.
2 – You need only one of these columns to import the file on Google My Maps: Place names, Addresses, or latitude-longitude information.
3 – Create a new layer in an existing map or create a completely new map.
4 – Under the layer’s name click “Import”.
5 – Select your file, and you will have a new map.
If there is an error in one of the rows, you will get a message. Open the data table to identify which row it is.
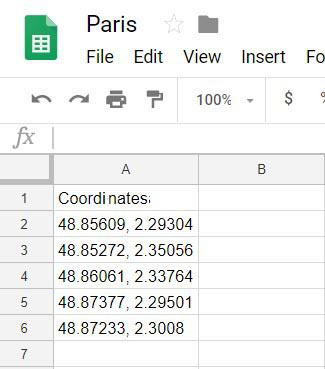
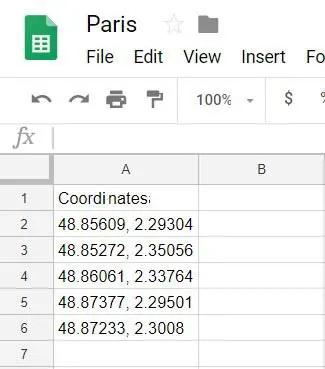
Coordinates (latitude-longitude) 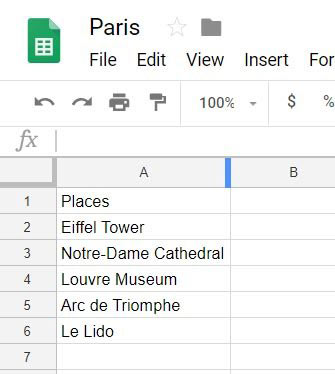

The places we want to import 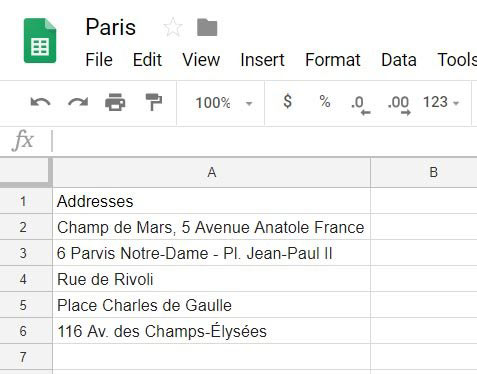
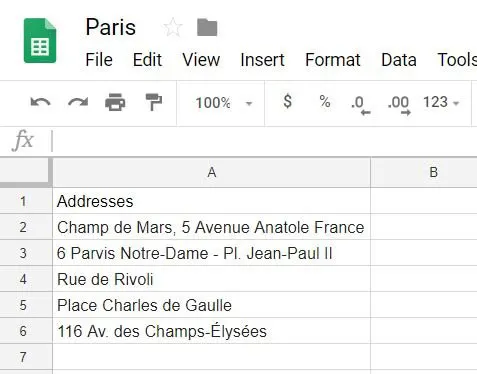
Only addresses
How to customize your map
Steps:
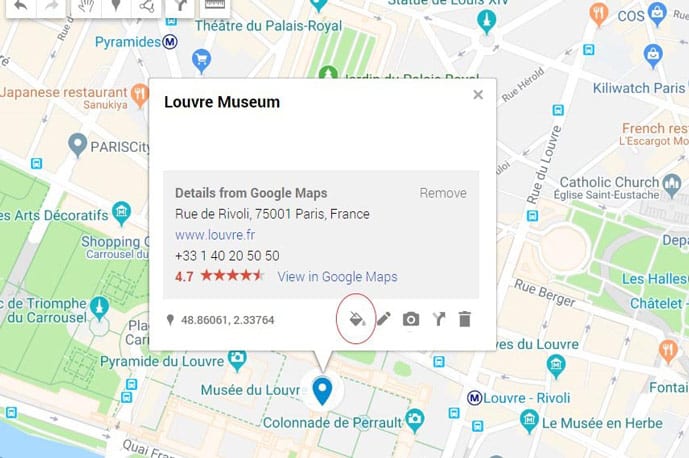
1 – Click on a pin you placed on the map.
2 – Click “Style” (Bucket icon) to customize your pins with different colors and/ or personalize them. We use color coding per layer, so it’s easier for us to identify them, especially if the map is zoomed out.
3 – Click “More icons” to find seven categories of icons for almost all situations, such as entertainment and sports.
4 – Continue and select “See older icons” in the lower right-hand corner.
5 – Last, but not least. You can also upload custom icons, like your company’s logo or something funny.
- In case you want to change all pins of the layer in one go, under the layer’s name, click “Individual styles” and select “Uniform style.”
6 – Click “Edit” (Pencil icon) to change the pin’s name or add a note.
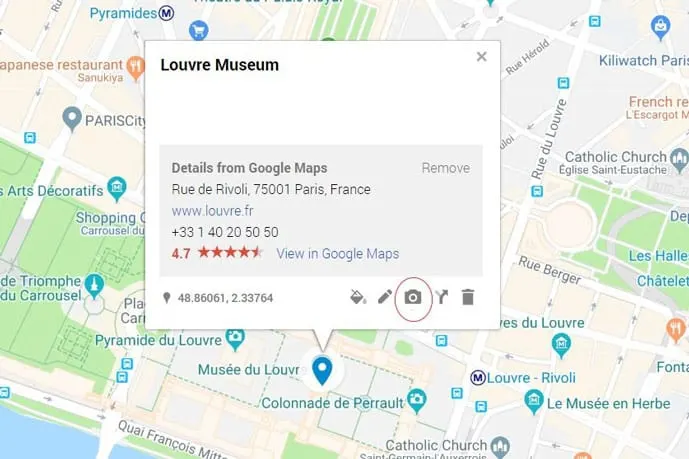
7 – Click “Add image or video” (Camera icon) to add up to ten images or videos to a pin. Maybe you’re a photography lover, and you saw a specific shot on Instagram or Pinterest that you want to reproduce yourself. Here you can upload files from your computer or Google Drive, take a photo with the webcam, paste the image URL or YouTube video URL, or just do a Google Image search (be sure to read up on the license of that image before using it).
- Under the file you’ve just uploaded, there will be an icon to add more files and another to delete it.
- Note: You can also include images or videos by clicking the pencil icon to edit the name of your pin.
- To delete a pin click on the trash bin icon.

Click to change the pin color 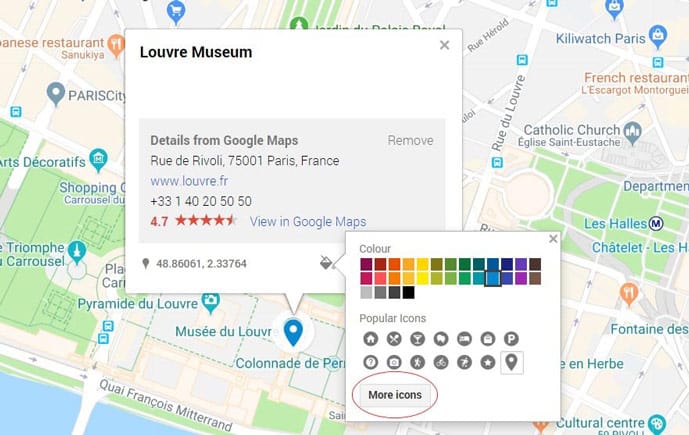
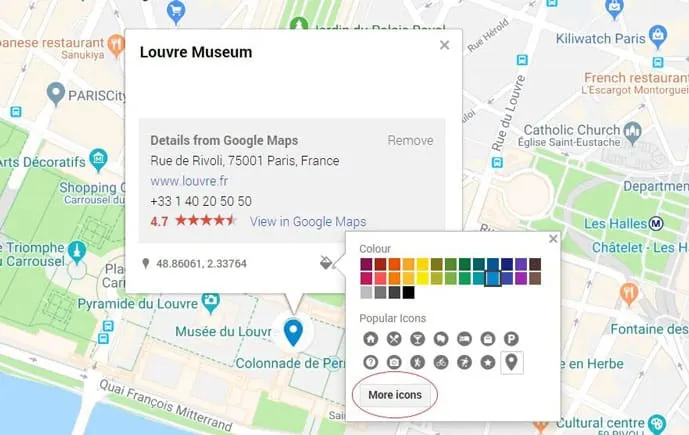
Click “More icons” to see all icons available 
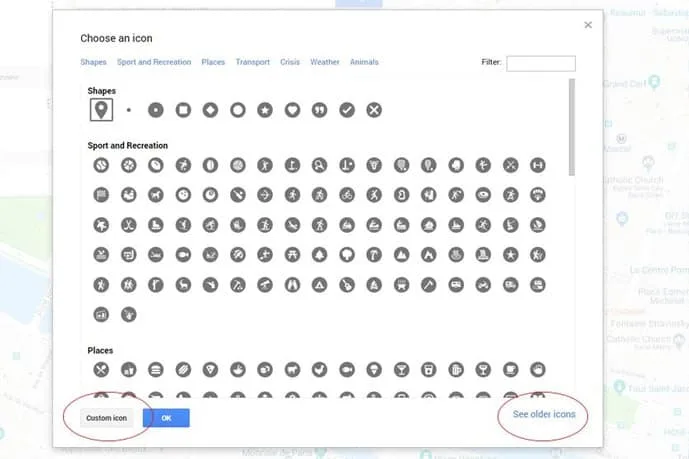
Some of the icons 
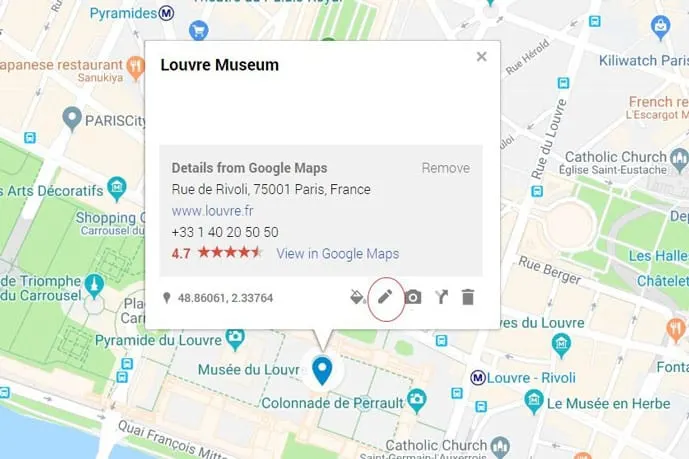
Change the pin name or add a note to it 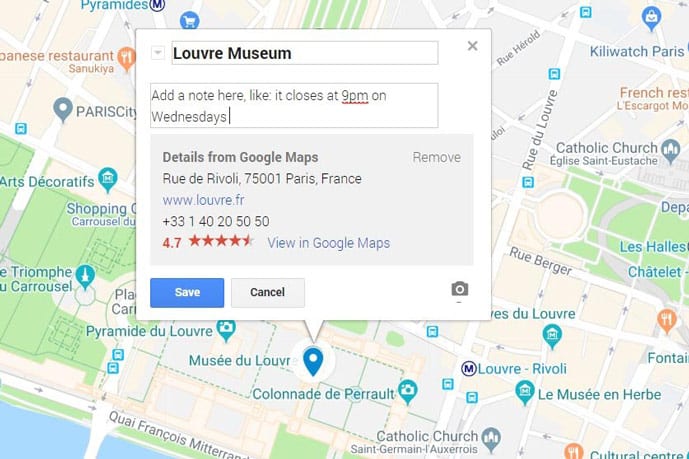
Adding a note to a pin on Google My Maps 
Add an image or video 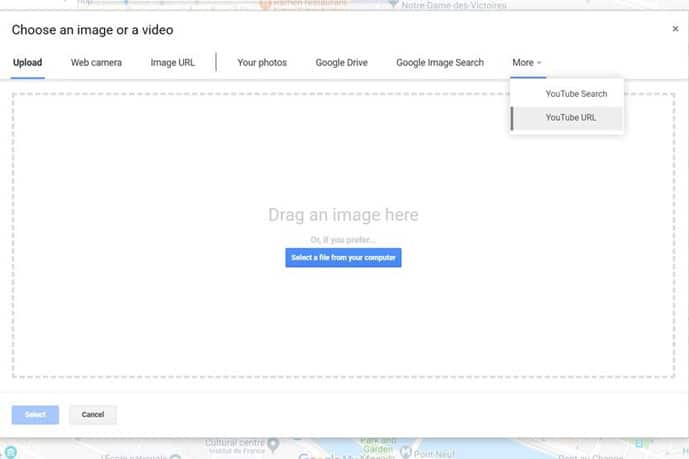

Select an image or video 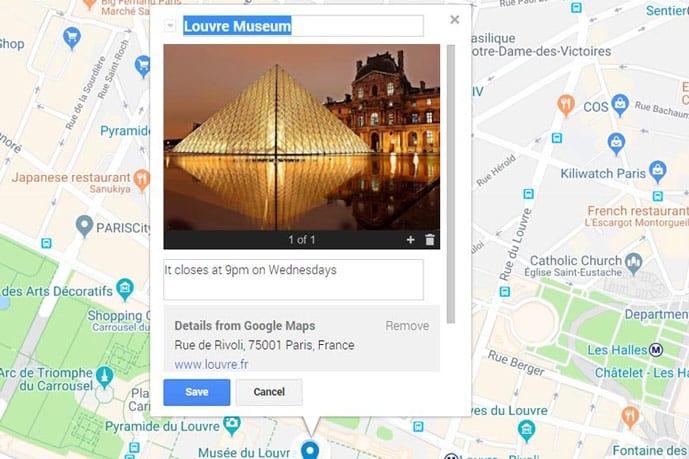

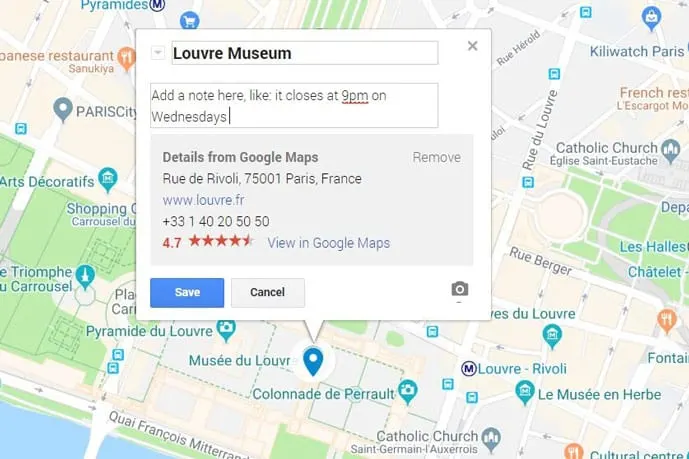
Just click “Save” and it’s done
How to add driving directions to Google My Maps?
You can add driving directions to Google My Maps in advance. There are three ways to add them.
1. Easiest one
Steps:
1 – Click “Add directions” under the search bar.
2 – Type in both addresses or select the pins on the map.
3 – In case you’re riding a bike, click “Driving” under the layer’s name to select the correct transportation.
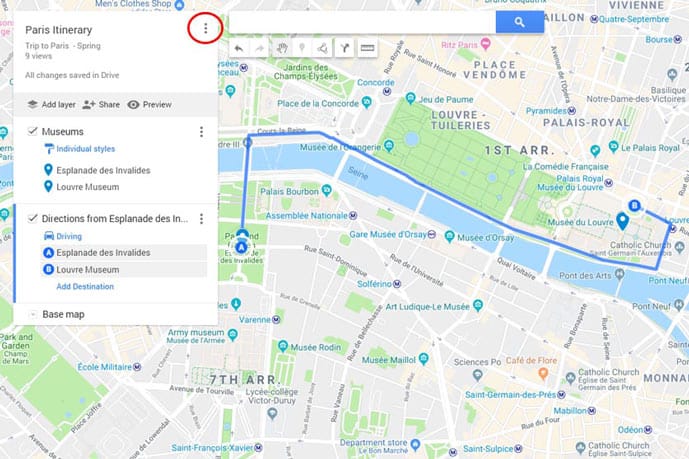
4 – Click the three dots next to the layer’s name -> “Step-by-step directions” to know the route’s distance, travel time, and directions.
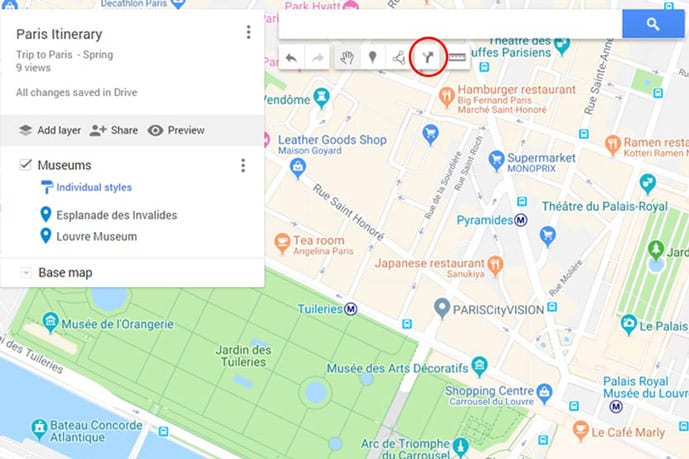

“Directions” button 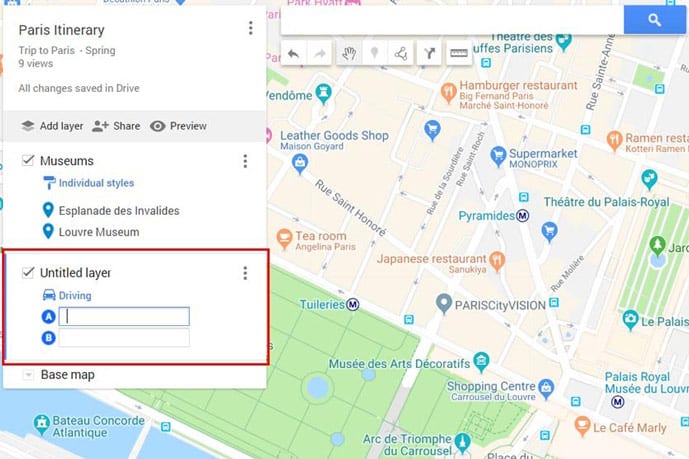

Type the address in or click on a pin 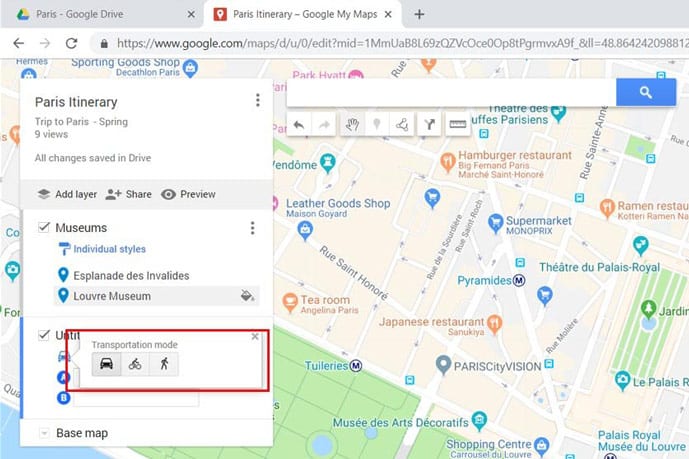
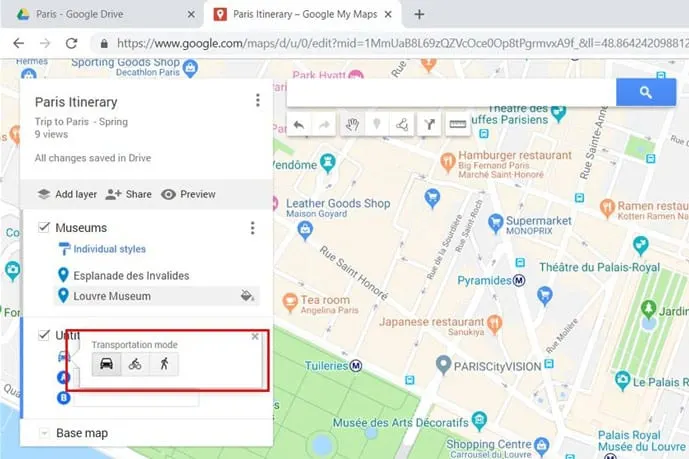
Select one of the options: Driving, Cycling or Walking 
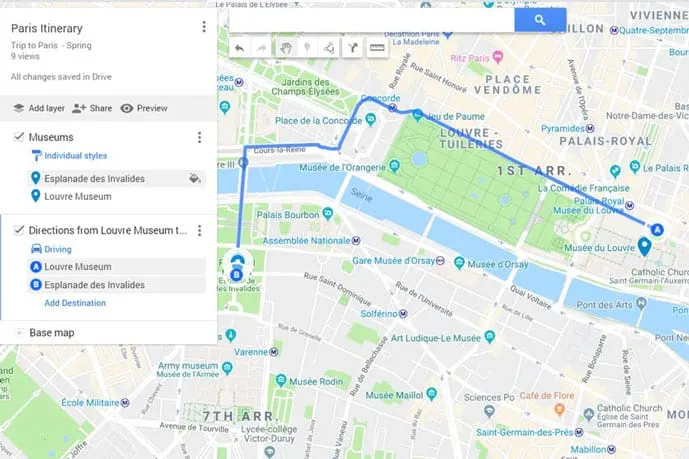
Your route will appear on the map 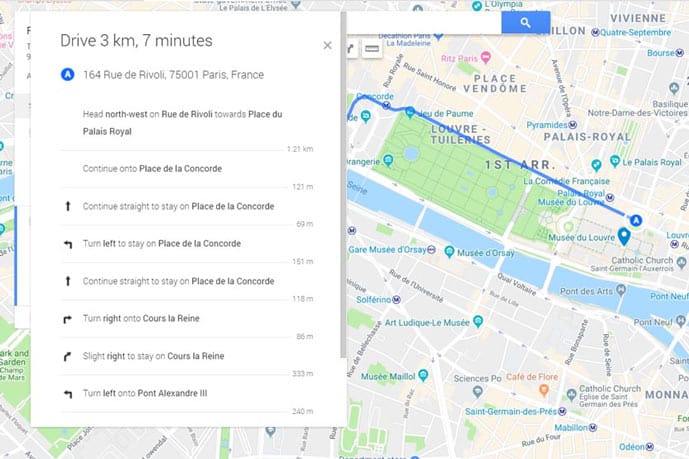
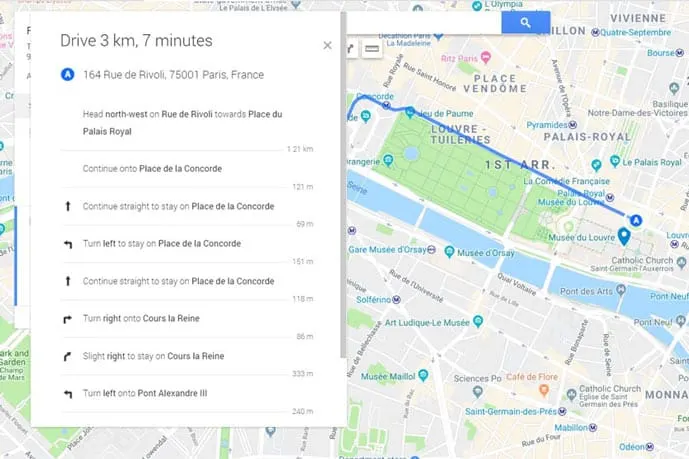
Click the three dots next to the layer’s name to see the detailed route
2. When you know the location, but not the address
Steps:
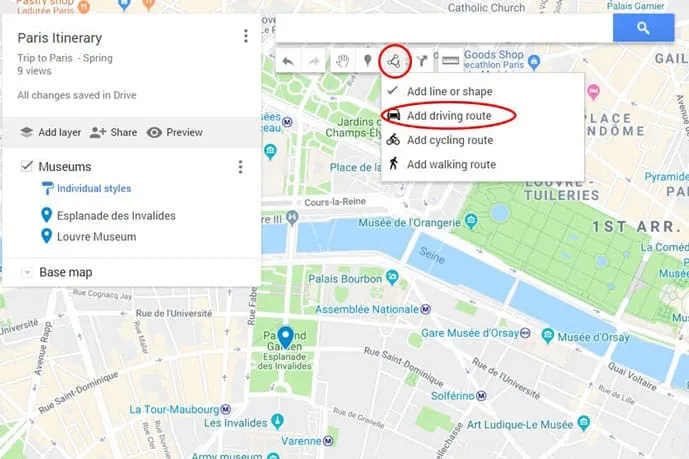
1 – Click “Draw a line” under the search bar.
2 – Select Driving Route
3 – Select the start and double-click on the end of the route to close the path on the map.
4 – Click the three dots next to the layer’s name -> “Step-by-step directions” to know the route’s distance, travel time, and directions.
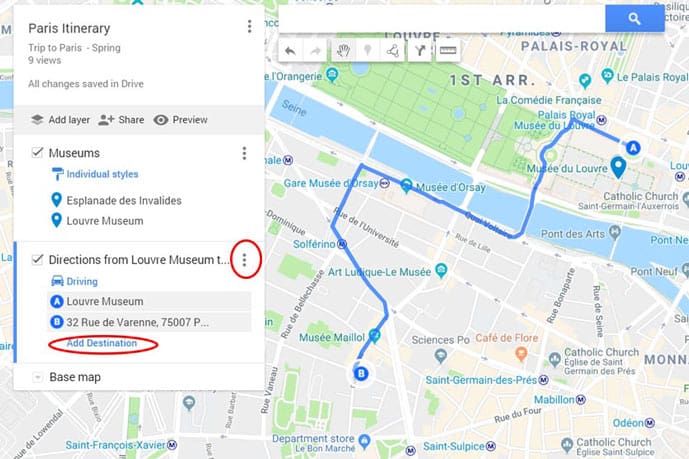
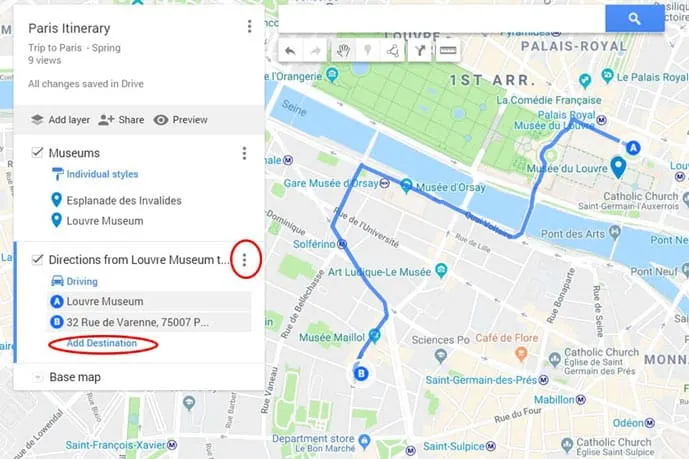
- If you want, you can add multiple stops along your route. Click “Add Destinations” under the addresses of the layer.

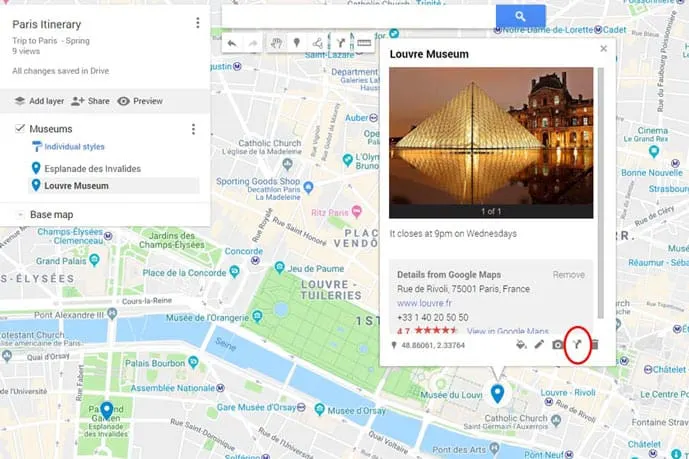
3. From a pin
Steps:
1 – Click the pin of your destination to open the popup.
2 – Click “Directions to here”.
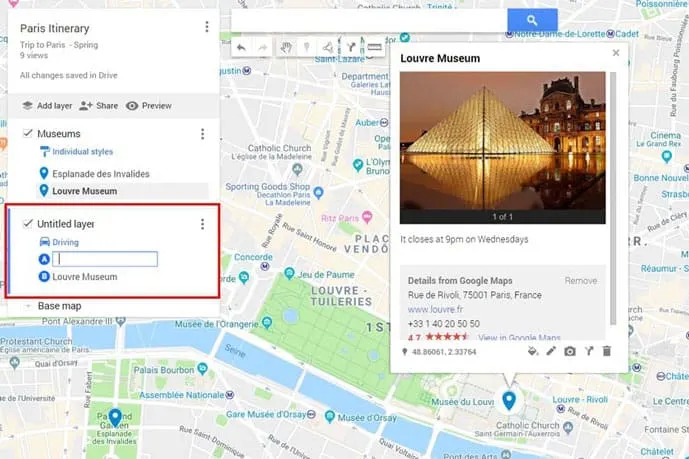
3 – Google My Maps creates a new layer where you have to type the starting point address or select the pin on the map.
4 – Click the three dots next to the layer’s name -> “Step-by-step directions” to know the route’s distance, travel time, and directions.
- Note on the image below that I have two layers. One with the location pins and another with a driving direction from one attraction to the other. Google My Maps can’t add routes in the same layer as the pins. It has to be a “Directions layer” only.
- If you want, you can add multiple stops along your route. Click “Add Destinations” under the addresses of the layer.


How to change directions on Google My Maps?
Let’s say you want to choose another route, but the starting and ending points are the same.
Click on the blue line of the path, hold the mouse down and drag it to where you would like it to be. If you create a white dot in the wrong place, just double-click on it to delete it.
Now, instead of changing the route you want to invert the direction. For that, click on the location name on the left-hand sidebar, hold the mouse down and drag it to reverse the position above/ below the other.
If you’re going to change the address only, click on the Pencil icon.
How to use Google My Maps on mobile?
The big question.
Well, to create maps and make all the adjustments we mentioned above, you need to use a laptop/desktop.
All mobiles (Android and iOS) can access My Maps through Google Maps app, but there iOS users can’t change anything.
Google Maps App Steps:
1 – Click the three horizontal bars (aka hamburger menu) on the top left-hand corner of your screen.
2 – Click “Your places” -> “Maps.” (You might need to scroll left to see the ‘Maps’ tab).
3 – There you have all the maps you have created on My Maps. Open the map you want.
4 – Click on a pin and then on “Directions” to follow a route.
- You need an internet connection to see your saved maps.
- You can also see the driving route (or cycling/ walking) you have created on the map. However, you can’t navigate them. All you can do is leave the map open and just follow the blue path as you drive/ walk. That’s a way to do it.
Can I use Google My Maps offline?
The short answer is no. The step-by-step guidelines to edit a map consider you’re online.
You can however open the map while using WiFi, and then you turn off any internet connection without closing the app. The GPS will show on the map where you are, so you can still follow the blue driving route.
And in case you have no WiFi in the first place, you won’t be able to see the map you have created. But…there is a workaround!
You can create your map with your whole itinerary, pins, and driving routes. Then import it into another app where you can navigate the directions offline. Here’s your step-by-step tutorial:
1 – Plan your trip using Google My Maps as usual.
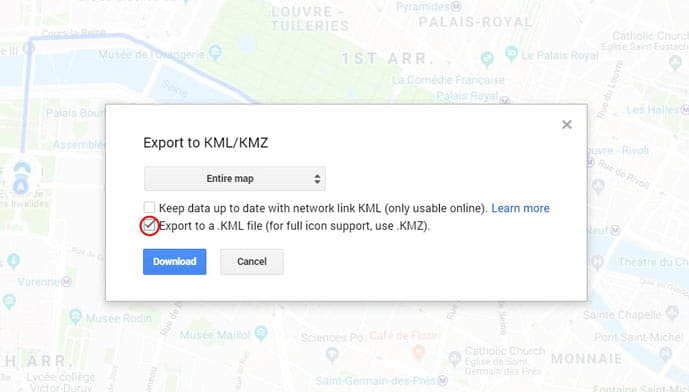
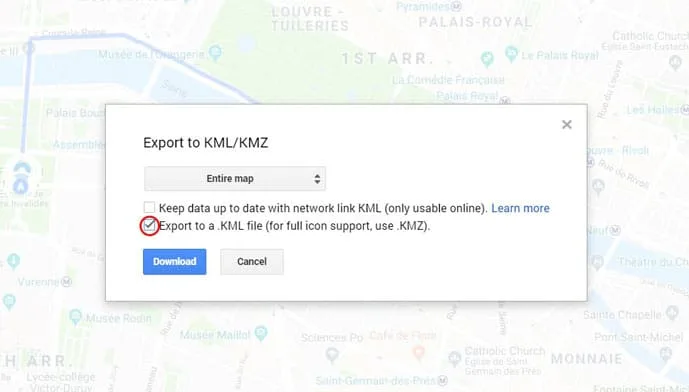
2 – Click the three dots next to the map’s title and select “Export to KML/ KMZ.”
3 – In the popup, check the second option (KML file) and download it.
4 – Download the app Maps.me (click here for Android or here for iOS).
5 – Send the file to an email you can open on your mobile.
6 – Open the email and select to open this file with Maps.me. It will automatically import to the app.
7 – In the app, you will have to download the map of the area to access it offline. You’re good to go now.
- With Maps.me you can create offline routes on the go, so you can still use your map without WiFi connections.


Are there any other questions you have about Google My Maps? Drop it in the comments, and we’ll try our best to answer you.
Just for fun: Find all sorts of maps in this gallery. From TV series locations to highest peaks in each USA state.
Where does Google My Maps fall short?
1. 10 layers
It only allows you to create ten layers per map, which is not handy. If you’re going on a 15-day hiking trip with short day hikes, you will have to create two maps to add all locations and routes you want.
2. One layer for each route
Google My Maps is full of limitations, and this is another one. Since you can only have up to 10 layers, you can have up to 10 routes per map. Also, you can’t group directions, let’s say, per region, and that’s annoying.
3. It doesn’t work offline
This is perhaps the biggest downside of Google My Maps because when you’re on vacation, the reason you need a map in the first place is to guide you there. And international mobile fares are scary, to say the least.
4. It doesn’t support GPS navigation
Another big downside. Mister (or lady?) Google is exceptionally high-tech, but they didn’t manage to let its users navigate their driving routes (or cycling/ walking) as if they were using a GPS device. To do that you have to use Google Maps and leave the map you created.


5. You can only add one image/video at a time – up to 10
Not that we have ever used the full limit they offer, but we do have photographer friends who are annoyed by this.
Like the example we mentioned above, they add images of interesting angles they would like to photograph to each Google My Maps location.
6. Change directions on the laptop only (iOS only)
The mobile limitation of Google My Maps is frustrating. If you want to change course, edit or add pins, or basically make any changes to your map, you need to use your laptop. On mobile, you can only visualize it. Android users, be happy!
Conclusion
Google My Maps is an excellent tool for route planning and organize your trip itinerary, but it also has some limitations. If you know how to work around them, you will be just fine during your road trip or vacation.
Questions, suggestions, or more travel tips? Say ‘hi’ in the comments below. We would love to hear from you!
Did you like this post? Then help me spread the word and pin it to your Pinterest travel board!


Our best travel tips & resources:
Here're our all-time favorite travel tips & resources so that you can save money and plan your travel logistics hassle-free! For more travel resources, check out our travel tips.- Saving money: Fly on offseason, winter (not Xmas or NYE), Tuesday, or Wednesday! According to experts, these are the cheapest days to fly.
- Travel insurance: Before you leave for your trip, make sure you have a valid travel insurance policy because accidents happen on the road. We have been paying for Safety Wing travel insurance for a little over a year now, and we happily recommend them to our family and friends.
- Accommodation: We usually stay in mid-range comfy hotels or private rooms in hostels. These are the sites we use to book accommodation: Booking.com for hotels (excellent flexible cancellation policy) and Hostelworld for hostels (low deposit and easy cancellation).
- Tours:We absolutely love booking guided tours with locals to get a history lesson while sight-seeing, especially food tours and walking tours! We book all of our tours using Viator and GetYourGuide.
- Transportation: We use Google Maps to figure out how to get around a place using public transport. When we book a rental car, we always use Discover Cars to find the best deal.
Laura
Tuesday 11th of October 2022
Thanks so much! This was incredibly helpful. Do you know how to rearrange the listed order of the layers?
I am an iPhone user, and while I'm disappointed to learn that I cannot edit the map from my phone, at least I know now that it isn't me! Google Maps also has a "Your Places" feature where one can add items via web OR phone (where it's accessed via the "Saved" icon.) It seems to be similar to My Maps, in some ways. I've used this feature in a pinch when adding destinations without access to my laptop. Do you know if there's an easy way to later import a list into a Map?
John Rock
Friday 25th of June 2021
Enjoyed your article, especially since I love the 3D appearance of Google Maps. Although I'm disappointed I cannot navigate with Google My Maps, it's useful to know it; if only so I can stop looking for something that's just not out there! 😕. But at least I can navigate with the Google Maps app (if not Google My Maps). Maybe that'll change in future, I'll subscribe to your website and keep tabs that way, since I have a certain fascination with Maps, especially with "Living Maps" (my term of endearment for GPS). Thanks, great read!
John
Monday 11th of January 2021
This product is clearly not of merchantable quality as required by local legislation here in New Zealand (and downloaded for use here). I'm waiting for legislators in this country to stumble over this fact and to do something meaningful with that information. One can't fail to be cynical about why this otherwise excellent product has the limitations outlined, in particular allowing only 10 layers which for the month long trip I'm planning, is patently absurd. I wonder how long before google tries to sell me a version, for example, that allows me UNLIMITED- or at least twenty or thirty-layers? And an explanation of why they have built in this ridiculous limit? If they're unable to achieve this apparently simple task, perhaps google should be required to clearly state this label restriction BEFORE enticing us to use this product so we can look for a product that works. P.S. just to compund this information, I've stumbled across a google My Map - no actual means of contact, of course- that has FORTY SIX layers, clearly confirming that it can be done!
Rube
Sunday 13th of March 2022
@John, totally agree. Also, you can ony display routes for drive, cycle or walk. Forget integrating anything with public transport.